
Backups with Bacula
Backing up your apnscp sites automatically using Bacula.
You've asked for it and now it's here, we have released our backup system with Bacula for apnscp. Only one backup director is necessary, which in turn can manage backups for multiple apnscp servers. This guide covers backing up a server from a backup director on another server.
Current documentation may be found on GitHub.
This distribution allows for 2 simultaneous backup tasks. Servers are filed under /etc/bacula/conf.d/servers/n where n is 1 or 2 (or more if more than 2 parallel backups requested).
Bacula requires 1 server designated as the Director (bacula-dir), which initiates backups and stores data on the Storage Daemon (bacula-sd); this path is /home/bacula. The Director/Storage Daemon does not have to run apnscp. Skip down to Manual installation for free-form configration.
Each server that is to be backed up must run a File Daemon (bacula-fd), also referred to as a client. A unique password should be generated for each client and stored in /etc/bacula/local.d/servers/n/server-name.conf on the Director. Firewall permissions must be extended to permit access by the director.
Backups can be of two types,
| FileSet | Description |
|---|---|
| Client-Layer | Minimum viable backup, client data under /home/virtual/siteXX |
| Server | All data under / and /home except for logs and FST |
Backup clients must whitelist the Director in firewall. Director must whitelist clients in firewall. The only exception is if the Director and client are the same.
Installation
Installation is broken down into Director/Storage Daemon and File Daemon. The RPM bundled in this repo only covers Director/Storage Daemon usage. File Daemon installation requires manual configuration.
Director/Storage Daemon automated installation
Install the apnscp-bacula RPM from apnscp's official Yum repository. All dependencies will be pulled down automatically.
yum install -y bacula-client bacula-director bacula-storage bacula-console apnscp-bacula
Storage Daemon, Director, and File Daemon will automatically be configured upon installation. Changes may be made to /etc/sysconfig/bacula-vars. Note that SD_HOSTNAME will default to the machine's IPv4 address. This address is sent to the backup client to inform it to connect to the Storage Daemon at this address.
Configuring initial backup task
A default Client-Layer backup task will be created that runs every night. This backs up accounts under /home/virtual as part of apnscp. If you would like to backup the whole server, then edit /etc/bacula/local.d/servers/1/self.conf. Change FileSet from Client-Layer to Server. Any template in conf.d/servers/ may be copied to local.d/servers/ for customization. It will not be overwritten.
Backup/restore crash course
Your first backup
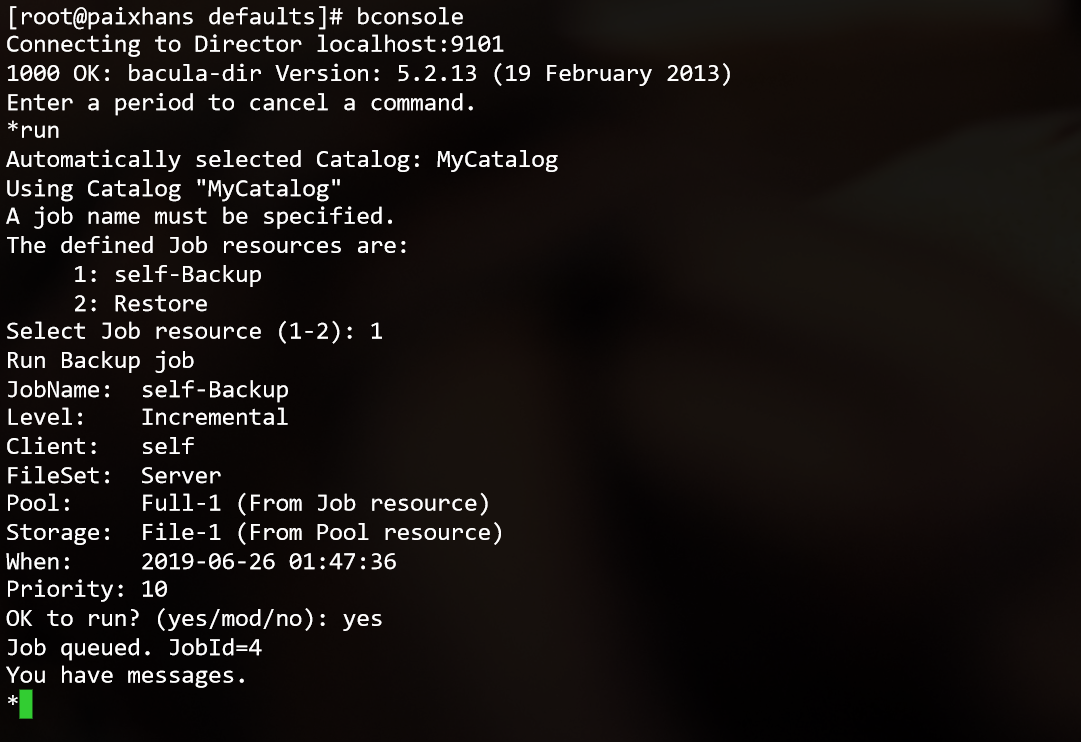
Access the console to run your first backup!
- Type
bconsoleto enter Bacula's console - Type
runto run a backup task - Select the task to run. NB: these will run every night automatically
- Confirm the task with
yes
bconsole
# Connecting to Director localhost:9101
# 1000 OK: bacula-dir Version: 5.2.13 (19 February 2013)
# Enter a period to cancel a command.
* run
# Automatically selected Catalog: MyCatalog
# Using Catalog "MyCatalog"
# A job name must be specified.
# The defined Job resources are:
#     1: self-Backup
#     2: Restore
# Select Job resource (1-2): 1
# Run Backup job
# JobName:  self-Backup
# Level:    Incremental
# Client:   self
# FileSet:  Server
# Pool:     Full-1 (From Job resource)
# Storage:  File-1 (From Pool resource)
# When:     2019-06-26 01:50:15
# Priority: 10
OK to run? (yes/mod/no): yes
# Job queued. JobId=6
# You have messages.
*
Backups are stored in /home/bacula/1 or 2/ depending upon slotting. That's it!
Your first restore
Now that the backup has completed (status dir from bconsole), let's restore from backup.
-
Enter restore mode using
restorecommand -
Locate Find the JobIds for a backup for a client before a specified time from the menu, usually item 10.
-
Enter the last known time your files worked, e.g. 2019-06-29 12:00:00 (NB: 24-hour clock)
-
Take the JobId from the result.
-
Locate Select full restore to a specified Job date, usually item 12.
-
Enter JobId from above.
-
Navigate to the location to restore, all sites are backed up by site.
cd /home/virtual
ls
cd site1/
cd shadow/var/www/html
mark *
done
In future iterations of apnscp, you will be able to mark site1 from /home/virtual to restore the entire site
-
Confirm the location to restore. By default /tmp is used to avoid overwriting data. Type
modto modify the restore parameters, then change path to / to overwrite everything. -
Enter
yesto confirm everything is OK
Restore takes a few seconds to minutes to complete depending upon how large the backup is. status dir will note whether it's still running.
Copying restored files
When restored to /tmp, extended attributes - including ACLs - are preserved. Use cp -a or rsync -a to ensure these attributes are preserved.
cp -an /tmp/home/virtual/siteX/shadow/var/www/html /home/virtual/siteX/fst/var/www/
rsync -a /tmp/home/virtual/siteX/shadow/var/www/html /home/virtual/siteX/fst/var/www/
In the above examples,
cpwill replace any file missing or older than the backup reference.rsyncalternatively overwrites all files. CentOS/RHEL aliasescptocp -iprompting for confirmation before overwriting.
Adding additional machines
For each server, install bacula-client, set a password, whitelist the client on the Director and whitelist the Director on the client. Let's assume the client named, "server-1" has the IP address 61.2.12.11 and Director, "storage-master" has the IP address 43.2.1.5.
# On client, "server-1"
yum install -y bacula-client
cd /etc/bacula
# Whitelist Director's IP
cpcmd rampart:whitelist 43.2.1.5
# Generate a random password, record it
# Sample password: foo/bar+baz
openssl rand -base64 32
# Set password for director
nano /etc/bacula-fd.conf
# Change Password = "@@FD_PASSWORD@@" in the first Director { ... }
# Password = "foo/bar+baz"
systemctl enable bacula-fd
systemctl restart bacula-fd
The client's configured. Now return to the Director to add the client profile,
cd /etc/bacula/local.d/servers/
cp 1/self.conf 2/server-1.conf
nano 2/server-1.conf
# Edit Name = self, Password = "XYZ", Address = "127.0.0.1"
# New configuration should look like
# Client {
#        Name = server-1
#        Password = "foo/bar+baz"
#        Address = "43.2.1.5"
#        FileSet = "Client-Layer"
# }
systemctl restart bacula-dir
That's it! A new backup task is now available.
Manual installation
Refer to steps above unless specified below.
Director/Storage Daemon manual installation
Clone repository and install supplemental RPMs.
git clone https://github.com/apisnetworks/apnscp-bacula
yum install -y bacula-director bacula-client bacula-storage bacula-console
systemctl enable bacula-sd bacula-dir
Link MySQL driver to baccats,
alternatives --set libbaccats.so /usr/lib64/libbaccats-mysql.so
Create a database to store backup metadata,
# Create database + grants
echo "CREATE DATABASE bacula; CREATE USER bacula@localhost IDENTIFIED BY 'somepassword';" | mysql
# Populate database
env db_name=bacula /usr/libexec/bacula/make_bacula_tables mysql
Create a file that stores environment variables for Bacula components,
touch /etc/sysconfig/bacula-vars
chown bacula:bacula /etc/sysconfig/bacula-vars
chmod 600 /etc/sysconfig/bacula-vars
Edit /etc/sysconfig/bacula-vars. Set the following credentials:
| Variable | Purpose |
|---|---|
| DB_HOSTNAME | Database hostname (usually "localhost") |
| DB_USER | Database username (usually "bacula") |
| DB_PASSWORD | Database password as set above (do not use "bacula") |
| DB_NAME | Database name (usually "bacula") |
| SD_HOSTNAME | Storage daemon hostname (IP address of Director) |
| SD_PASSWORD | Storage daemon password (do not use "bacula") |
| MONITOR_PASSWORD | Monitoring via "bat" app (do not use "bacula") |
| DIR_PASSWORD | Unrestricted director password (do not use "bacula") |
| CONSOLE_PASSWORD | Console password via bconsole (do not use "bacula") |
All credentials will be automatically set for both the directory and storage daemon
Start Bacula services.
systemctl enable bacula-sd bacula-dir bacula-fd
File Daemon manual installation
For each device whitelist firewall using firewall-cmd.
firewall-cmd --permanent --zone=public --add-source=192.168.100.1